How to avoid 'metafield hell': a durable and scalable Shopify data architecture
Do you feel that your Shopify products are drowning in metafield chaos? Do you have dozens of custom fields that are difficult to manage and maintain? You're not alone. Many stores fall into the trap of 'metafield hell' – a situation where an excess and disorganization of metafields leads to messy product data, maintenance issues, and growing technical debt. In this article, we'll explore this problem and show you how to solve it by designing a durable, scalable data architecture in Shopify. We'll focus on metaobjects, product categories, and data validation as keys to bringing order to the chaos. All of this in Attoma's style: smart, concrete, and practical – understandable even for non-developers.

January 26, 2026
|
Kamil Ficek
Metafield hell - what is this problem and what are its consequences?
Initially, metafields seem like a godsend, allowing you to add any additional information to products. The problem is that without a plan, they quickly turn into an architectural nightmare. Imagine a store that adds new fields to products for every new marketing idea: a size chart thrown into the product description, a promotional banner duplicated across five templates, a list of product features 'hardcoded' into Liquid – all just to avoid another metafield. Sound familiar? If so, you've experienced metafield hell.
The consequences of such an approach are serious:
- Data and admin interface clutter: The list of custom fields grows unwieldy, names become arbitrary, and data connections are weak. Without a proper structure in place, right before your store launches, you risk a 'spaghetti' mess of haphazardly connected fields with strange names. It's hard to figure out which field is responsible for what, leading to errors.
- Difficult maintenance and updates: If you want to change, for example, the content of a recurring block (e.g., product care instructions), you have to edit each product individually, because information is duplicated across many metafields. This is tedious and creates a risk of inconsistency. Adding a new value requires creating another field in all products – which means multiplying entities unnecessarily.
- Technical debt: Chaotic data architecture is a ticking time bomb. A poor metafield structure creates technical debt, which will haunt your store in the future. The later you clean it up, the more expensive and difficult it will be to fix this mess.
- Performance and errors: An excessive number of metafields (especially poorly planned ones) can affect performance – each additional value is an extra element to load or retrieve via API. Lack of data validation, in turn, leads to errors (e.g., empty or invalid values) and the need to put out fires in a live store.
In short, metafields are like adhesive tape – they allow you to quickly stick something here and there, but a store patched up with it can look makeshift. 'Metafield hell' is a state where instead of making life easier, metafields make it harder. Fortunately, there's a way to escape this hell.
Metafields vs. Metaobjects - a new data order
Before we move on to solutions, let's clarify two key concepts: metafield and metaobject. Both are ways to store custom data in Shopify, but they differ in scope and capabilities. Understanding their differences is the first step to mastering data architecture.
- Metafield (additional field): This is a single piece of information (value) assigned to a specific object in Shopify, e.g., a product, variant, collection, page, etc. Shopify introduced native metafield support in 2021/2022. Metafields store simple data: text, number, file, color, true/false, etc. - anything not standard in the Shopify admin panel. Example use: additional parameters on a product page, such as dimensions, material, composition, usage instructions etc. Thanks to metafields, you can extend standard product information and customize the platform to your needs. The downside of metafields , however, is that the value must be filled in separately for each product - and if you want to change it, you also have to edit each product individually. In other words, a metafield is tightly linked to a single object. As a result, if you add a 'Material' field to 100 products, you have 100 independent entries, even if many of them contain the same value (e.g., 'cotton').
- Metaobject: They only appeared in 2023 and can be imagined as custom objects or 'small database records' with multiple fields. A metaobject is a grouped set of related metafields, forming a single entity (object). Each metaobject can contain multiple fields/metafields, and most importantly - it can be reused multiple times in different parts of the store. For example, you can define a 'Size Chart' metaobject containing fields: title, description, table image, additional note. Then you connect such a metaobject (e.g., for women's clothing) to multiple products. You change the content of the metaobject in one place, and the update appears in all associated products simultaneously. It's like creating your own small database within Shopify - structured content blocks that are centrally managed and repeatable. If a metafield was 'adhesive tape', then a metaobject is a complete toolbox - an organized set of tools with which you can build something proper. Metaobjects help avoid content duplication and tedious work - instead of pasting the same text snippet into 10 products, you create a metaobject and insert it as a reference.
In practice: If you're wondering when to use which approach, a simple expert rule is helpful: 'Is the given information a product parameter repeated across many products? If so - use a metafield. Is it rather a complex content block (section, info set) repeated in various parts of the store? If so - use a metaobject'.. Example: the field 'Material' or 'Height' for a product are typical metafields (each product has its own value, and the field is identical across many products). On the other hand, 'Collection Designer Profile' or 'Size Chart' are pieces of content that can be shared - an ideal role for a metaobject.
From an e-commerce business perspective:
- Metafields are suitable for simple attributes and parameters unique to a product (or variant). They allow you to quickly add, for example, material composition, expiration date, washing instructions - and display this information on the product page. They are easy for a store manager to enter (you input the value on the product card) and are also great for filters or product tagging. The problem arises when there are too many such fields, and some of them contain repetitive content.
- Metaobjects are a more powerful content management tool. They allow you to create multi-element content modules, which you can attach to products, pages, or collections. It's a bit like a mini CMS within Shopify. For a marketer, this means greater freedom - for example, they can prepare 'Lookbook - styling', 'FAQ Section', 'Promo Banner' blocks, etc., themselves, and then the development team will connect them to the appropriate places in the template. Metaobjects also simplify expansion: if you need another element (e.g., another feature, another 'content block'), you simply add a new metaobject entry - you don't have to define new metafields and rework the database structure. Metaobjects reduce data redundancy - a single piece of content can be used in multiple places without copy-pasting.
In short: Metafields are single product data extensions, while metaobjects are repeatable blocks from which you build consistent content. Both functionalities complement each other - and in a moment, we'll see how to practically use them to avoid chaos.
Practical examples
Theory aside, how does this play out in real stores? Here are three simplified, anonymized case studies inspired by reality:
Case 1: From field chaos to data standardization
The first example is an electronics store. Each product had many specific features: measurement accuracy, range, power supply, certifications, etc. Initially, the team added this information to descriptions or created individual metafields for the more important parameters. Over time, this grew to dozens of metafields per product - many of them inconsistent (e.g., sometimes 'Power_supply', sometimes 'Zasilanie'), others duplicated across different categories. The result? Clutter and inconsistencies. When updating data, an employee often missed some fields because it was difficult to find them all. The solution came with new Shopify features: product categories and validations.
The team decided to use Shopify's Standard Product Taxonomy and assign products to appropriate categories (e.g., "Medical Equipment > Thermometers"). This allowed them to unlock category metafields – which are predefined attributes for a given category, such as "Temperature Range", "Power Supply", "Battery Type", etc., with ready-to-use values to choose from. These fields are based on Shopify metaobjects – they contain lists of standard values (e.g., a list of a dozen battery types, a list of ranges) for immediate use or customization (for example, you can change the color name "black" to "graphite" to match your branding). The company thus unified product data: each product type now has the same, standardized fields. Validation (limiting to predefined options) ensured that, for example, the device color is selected from a list (black, white, blue...) instead of being entered manually, which eliminated typos and different variations of the same value.
After implementing these changes, data maintenance became simpler,and the store gained consistent filters (because values align) and proper synchronization with channels (e.g., Google, Facebook – which require standardized categories).
Case 2: Metaobjects for Shared Content
Another example company sells sports equipment. Their distinguishing feature is an extensive section of training tips and exercise plans linked to products. Initially, the team added these tips directly to product pages – as additional tabs with text or links to PDFs. Each product had slightly different content, but much of it was repetitive (e.g., various dumbbells referred to the same beginner training plan). Marketing wanted to regularly update these plans, which meant editing a dozen or so products at once. Sometimes one would be missed – and customers would see outdated information. This is where metaobjectscame in.
Attoma's solution involved creating metaobjects of type “Training Plan”. Each such metaobject contained fields: plan title, difficulty level, description, downloadable PDF file, preview image. Then, a reference metafield "Training Plan" pointing to the metaobject (type: reference to metaobject) was added to the products. This allowed a given plan to be linked to multiple products – e.g., the "Full Body Beginner" plan for dumbbells, kettlebells, and a training bench. When the trainers updated the plan, they did so in one place (by editing the metaobject), and the changes automatically appeared on all products using that plan. What's more, adding a new plan did not require structural changes – a new "Training Plan" metaobject entry was simply created in the content panel and linked to the relevant products. The company followed suit and similarly handled, for example, sections with dietary advice (another metaobject type).
For the team, this meant huge time savings, elimination of content duplication, and reduced risk of inconsistencies. Customers, in turn, gained always up-to-date, valuable information without chaos.
When to use metafields, when to use metaobjects – or perhaps both?
Based on the examples above, here are some practical tips:
- Use metafields when: data concerns a single product and is relatively simple (a single value). These can be additional technical attributes, dates, numbers, short texts that will not be shared in identical form across multiple objects. Metafields are great for supplementing specifications or unique product features (e.g., material composition, country of manufacture, unique catalog number, vegan status of the product, etc.). When properly defined (more on validation shortly), they can also serve as the basis for filters or conditions (e.g., a metafield “eco-friendly” of type true/false, used to tag and filter eco-products).
- Use metaobjects when: you need a complex data or content structure used repeatedly. Metaobjects shine in situations where the same set of information needs to appear on multiple pages or when one object (e.g., a collection) contains a collection of attributes. Examples of typical metaobject uses in e-commerce include:
- Reusable content blocks in the store: e.g., promotional sections (a banner with graphics and text appearing in several places), “why us” sections on product pages, lists of physical stores (used on various pages).
- Extended sections on product/collection pages: the aforementioned size charts, designer profiles, usage instructions, tips (when you fill a once-defined structure with different content for different products/categories).
- Lists of elements or parameters grouped together: e.g., a "Product Features Set" metaobject containing a list of icons and descriptions (instead of 8 separate metafields – one metaobject with 8 fields that you can link to products requiring such a section).
- Marketer-managed content: Metaobjects allow non-technical teams to on their own add and edit content in the admin panel, without needing to delve into Liquid code. Once a developer prepares a section for a metaobject, adding subsequent "entries" can be done from Shopify settings, which frees up the dev team and gives flexibility to the content department.
- Reusable content blocks in the store: e.g., promotional sections (a banner with graphics and text appearing in several places), “why us” sections on product pages, lists of physical stores (used on various pages).
- Hybrid approach: In most cases, combining both solutions will yield the best results. The point is not to move everything to metaobjects now – they are great, but there's no need to use a sledgehammer to crack a nut. Simple fields (e.g., "Cable length [cm]") don't need a separate metaobject – it's better to keep them as metafields. However, wherever you find yourself duplicating a group of fields across many products or copying content between pages, consider extracting it into a metaobject. Often, both go hand in hand: a metaobject can be linked to a product precisely via a reference metafield. Example: you create a "Brand Guide" metaobject with a brand logo and description, but you attach it to products using a brand_guide metafield (type: reference > metaobject). In the product panel, you simply select the available metaobject entry from a list. This is a metafield + metaobject combination – but extremely effective, as it provides both flexibility and centralized content management.
In summary: metafield vs. metaobject is not a duel, but rather a duet. Each has its place in the architecture. Knowing their strengths, you can plan your store to avoid "metafield hell" – which we'll discuss next.
The Role of Product Categories and Validation – Order is Essential
Two things greatly help in organizing product data: product categories (Shopify Product Category) and field validations (metafield definition settings). They are often overlooked, which is a shame – because they can save a lot of trouble.
Shopify Product Categories – this is a relatively new feature (significantly developed in recent years) that introduces a standard product taxonomy. You can assign each product in Shopify to a specific category from a standard list (e.g., „Clothing > Tops > Shirts” i.e., Apparel > Tops > Shirts). Why do this? Firstly, many sales channels (Facebook, Google) require such classification – but from a data architecture perspective, what's more important is unlocking so-called category metafields. For each category, Shopify defines certain industry attributes. For example, for shirts, the available fields are: size, neckline, sleeve type, length, age group, material, target gender, clothing features, color. These are predefined metafields – ready to use immediately after assigning a product to a category. What's more, many of them are linked to default metaobject values (Shopify provides lists of standard colors, material types, etc.). You can use them "as is" or adapt the naming to your own (e.g., rename certain colors, add your own). This allows you to:
- You standardize data across the entire store. Since every product in a given category has the same set of attributes, it's much easier to compare products and maintain consistency. You avoid situations where one category has a "material" metafield, and another has a similar one called "fabric" – as often happens when they are defined manually.
- You speed up configuration. There's no need to manually create dozens of metafield definitions – Shopify provides a significant portion ready-made. For the fashion or electronics industry, this is a lifesaver.
- You better organize the interface. In product editing, fields appear in groups by category – making them easier to find and fill. And if a product changes category, Shopify can transfer already entered values to the corresponding fields of the new category (if they exist).
- You enable smart store features. For example, Shopify can automatically suggest categories for new products (based on AI), and along with them, suggest attribute values (e.g., it can recognize colors from the description and add them as category metafields). Furthermore, for product variants, category metafield values can be used to display, for example, color swatches - in Shopify, this is built-in for the "color" field in category metafields.
- You are organizing the store for customers. Standardized attributes can be used in store filters (Shopify Search & Discovery). For example, by having a 'material' field everywhere with a defined list of values, it's easy to add a filter like 'Material: Cotton/Linen/Leather,' etc. Customers will find what they need faster, and you'll be sure that the filter includes all products (because there are no naming discrepancies).
Of course, not every industry will perfectly fit the Shopify standard. But even then, it's worth assigning an approximate category (even a general one) to then extend the schema with your own metafields where needed.
Metafield Validation - the second pillar of order. When you create your own metafield (whether a regular one or within a metaobject), Shopify allows you to define its type and certain restrictions. Use this! Examples of good validation practices:
- Selection from predefined options (preset choices): Instead of a text field, provide a dropdown list if the values are from a set. For example, instead of manually typing "yes/no" or "small/medium/large," define clickable options. You'll save time and avoid errors. As practitioners advise, limiting to predefined options will save a lot of time - instead of manually entering for each product, you select from a dropdown list.
- Formatting and range: For numeric fields, set minimum/maximum values or a pattern (e.g., for codes). For text fields - maximum length or regex if required (though keep regexes simple to avoid overcomplicating).
- Required vs. optional fields: While you don't have a direct "required" option for metafields, you can establish in your business process that certain fields must be filled before product publication and, for example, monitor this with a report or automation (Shopify Flow can check for missing metafields and send a notification).
- Instruction description: Although not classic validation, the "Description" field when defining a metafield serves as a hint. It's worth briefly noting what and how to enter information there (e.g., "Enter weight in grams" or "Select one of the options: ..."). The content manager will certainly appreciate this.
Validation protects against entering junk data. If a field is meant to accept a URL, the panel will enforce it (and won't allow saving text that isn't a URL, for example). If we expect a positive number, the "integer (>=0)" type will handle it. The more such restrictions you add where it makes sense, the less cleanup you'll have later.
In summary: Product categories give you upfront order and a ready-made data plan, while validations ensure that data adheres to the rules. Together, they act as a safeguard against the return of chaos.
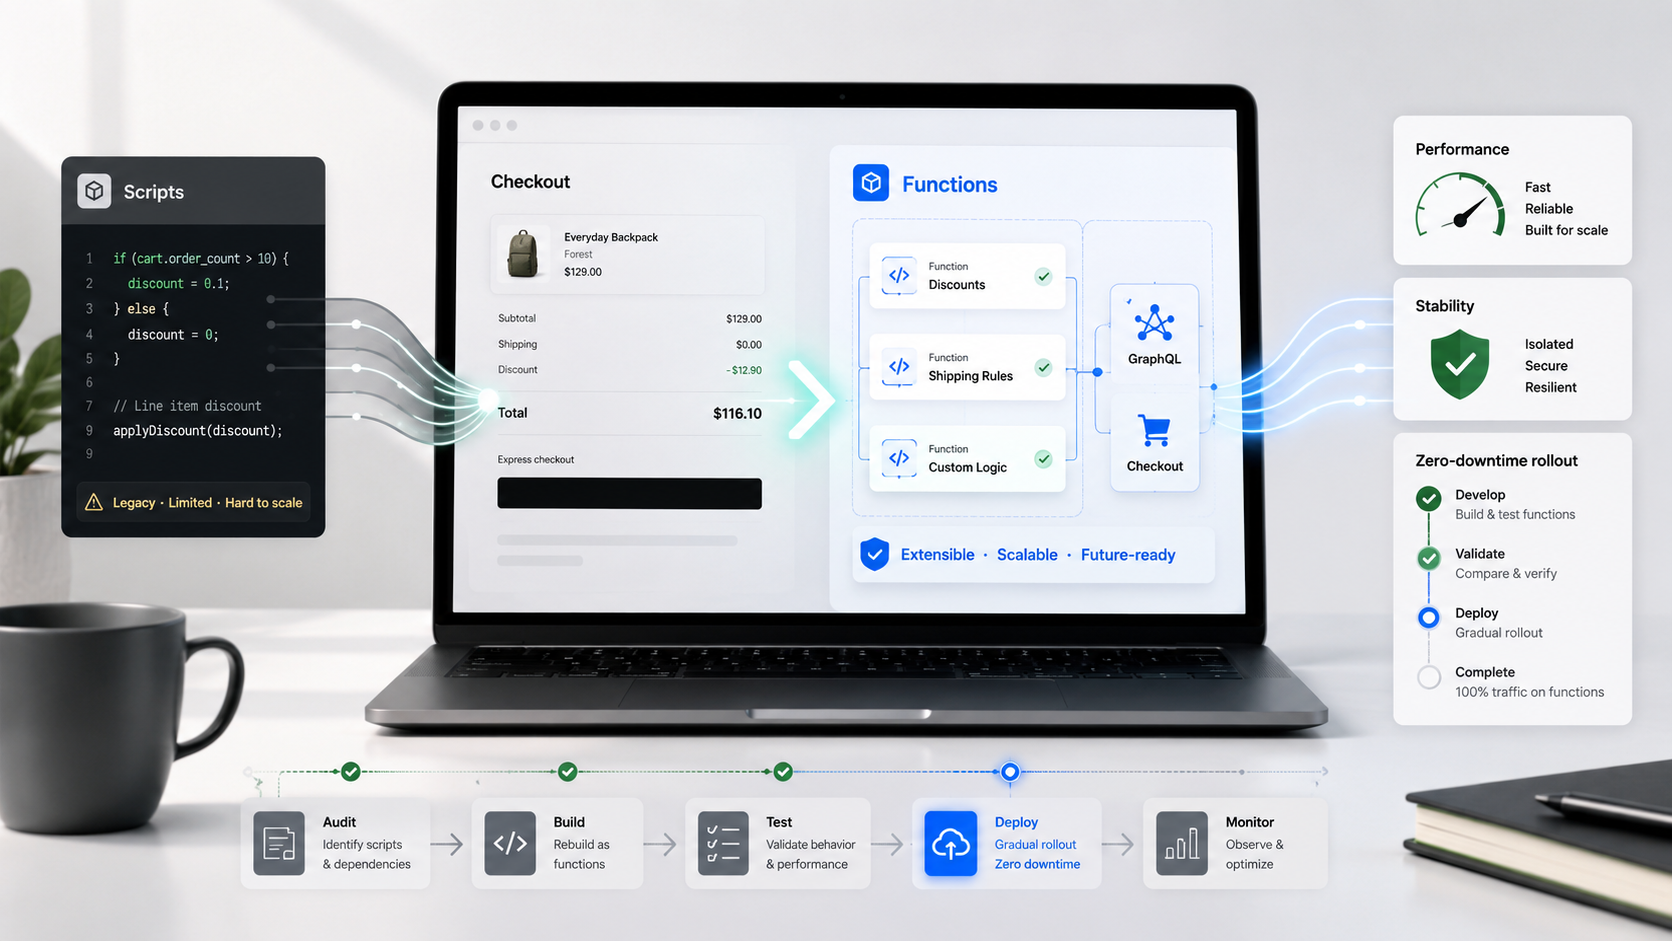
Action plan: step-by-step data refactoring
Now that we know what's in our toolkit (metafields, metaobjects, categories, validations), it's time to apply it. How to practically carry out data architecture cleanup in an existing Shopify store? Here's a step-by-step plan:
Step 1: Audit the current situation
Start with a review: What metafields are we currently using? Make a list of all metafield definitions in the store (the Settings > Custom Data panel will show you a list of them). Note which resources (product, variant, collection, etc.) they are used with. Look at example products to see what values are stored there. The goal of the audit is to identify:
- Duplicates (e.g., two similar definitions serving essentially the same purpose).
- Unused or empty fields (perhaps added once, but now not in use).
- Places where text fields contain structures of data (e.g., JSON in a metafield - a sign that it's worth structuring).
- Blocks of repetitive data - e.g., several metafields that always appear together (perhaps they can be grouped as a metaobject?).
Step 2: Design the new schema
Based on the audit, sketch/write down your target schema:
- Choose key product categories (if you haven't used Product Category yet, now is a good time to assign them - let this be the foundation).
- For each category, decide which attributes (metafields) products should have. Use Shopify's suggested standards, and where they are lacking - plan your own metafield definitions.
- Identify potential metaobjects: which groups of information are worth separating? Perhaps certain description sections, or entire objects (e.g., "video material collection," "lookbook," etc.). Plan the field structure for them.
- Establish naming and conventions: how to name metafield namespaces and keys (e.g., attomy.specs_weight vs attomy_specs_weight - it's important to maintain consistency), what data types you will use, and whether value lists are needed (list them immediately).
- Think about relationships: will a metaobject be a reference in a product? Will metaobjects be linked to each other (e.g., a "Designer" metaobject might have a reference field to a "Product List" metaobject by that designer - this is very advanced in some cases).
At this stage, it's worth involving both a technical person (Shopify developer) and a business/content person (product/content manager). Together, define priorities: what is essential, and what might be a "nice-to-have." Remember, the goal is simplification and consistency - let's not create an overly complicated structure.
Step 3: Prepare the testing environment
Refactoring is best done on a copy - either on a store copy (development store), or at least on a theme copy and with unpublished new definitions. Shopify allows you to add metafield and metaobject definitions without affecting the storefront (as long as they are not used in the theme). So you can confidently introduce new definitions in parallel with the old ones. To be safe, export your data (e.g., via CSV or a metafield export app) - in case something goes wrong, you'll be able to restore the data.
Step 4: Implement metaobjects and new metafields
Since you know what you want:
- From the panel, create metaobject definitions (Settings > Custom Data > Metaobjects > Add definition). Add the required fields to each metaobject.
- Add new metafield definitions - both regular ones (e.g., additional parameters) and those of the metaobject reference type (Settings > Custom Data > Products - or another object type > Add definition > type: Metaobject > select the appropriate metaobject).
- Set validations for these fields (selection limit, data type, etc.), help descriptions - according to the plan.
- If you use Shopify product categories, activate the relevant category metafields (they appear automatically when a product is assigned to a category - some are visible by default, others you can add by clicking “Add metafield” in the Category metafields section on the product page).
Step 5: Data Migration
This is the most tedious stage - you need to transfer existing information from the old "chaos" to the new, organized structure. Depending on the scale, do it:
- Manually: for smaller stores - by editing products one by one and filling in new fields (e.g., using the tabular view of the bulk editor for metafields, which speeds up the work a bit).
- CSV: Shopify allows CSV export/import with metafields - you can export products, process the data in Excel (moving old columns to new ones, merging them if necessary), and then import them into Shopify. Note: first add definitions for the new fields, otherwise the import will not assign them.
- App or script: There are apps in the App Store for bulk metafield management. Alternatively, a developer can write a script (e.g., in Python using the Shopify API) that automatically maps the data. This is useful for complex transformations - for example, if you have a JSON metafield from which a script can extract fields and create metaobjects via the API.
Don't forget to create metaobject entries (entries) where you planned them. For example, add specific instances of "Size Charts" (for women's, men's clothing, etc.), "Designer Profiles" (each designer separately), etc. - and then set them in the appropriate products/collections via the newly added references.
During migration Keep checking: whether the data matches, if any values are missing, or if, for example, a predefined list needs to be extended with a value that appeared in old data (e.g., the color 'burgundy' which wasn't on the list - add it so you don't lose the info).
Step 6: Front-end (theme) update
The new architecture will work when the store starts using this data. Therefore, the developer (or you, if you can, e.g., in the theme editor) must connect the new metafields and metaobjects to the templates. This means:
- Editing product, collection, and page templates to display new fields (e.g., changing the 'Specification' section to pull data from new metafields instead of old ones, inserting a 'Designer' section that uses a metaobject, etc.).
- If you're using Online Store 2.0 and the theme customizer, a lot can be done without code: for example, you add new 'text' or 'image' blocks in the editor, and select the appropriate metafield/metaobject as the data source (the database icon next to the field in the editor). For metaobjects connected by reference, the process involves first inserting a block in the dynamic section and linking it to the metaobject reference, then mapping the metaobject fields to the fields in the section – this is a bit more complex but described in Shopify Help and essentially comes down to clicking the right connections.
- Make sure all old references to old metafields have been replaced with new ones. You can search for old metafield names in the theme code (e.g., product.metafields.custom.old_field) to ensure nothing is left behind by accident.
Step 7: Testing and Quality Control
Switch the store (or publish the new theme to a test/development version) and meticulously check:
- That all planned information is displayed correctly on product pages.
- That nothing has disappeared – sometimes it's easy to overlook a secondary location, e.g., an app or theme component might have been using a specific metafield (check, for example, if filters work, or if data appears in Google Rich Snippets – if you used metafields there).
- Whether changing a metaobject, for instance, actually updates content everywhere (reference test).
- For validation, try entering something incorrect into an admin field (it should block or warn you).
- Overall: whether the new structure meets business expectations (covers all necessary information). If anything is missing, it's better to detect it now.
Step 8: Cleaning up the old mess
Once the new system is operational and you are sure everything has been migrated:
- You can delete old metafield definitions (Settings > Custom Data, delete definitions). Note: deleting a definition will make the data 'invisible' in the admin panel, but only deleting their values from objects will completely eliminate them. If you don't need this historical data, delete the definition – Shopify may automatically clear them after some time. To be sure, you can also manually clear values, e.g., by bulk importing a CSV with 'deleted' fields.
- Clean up any description fragments that were workarounds (e.g., if a product description once contained HTML for a size chart – now, with a metaobject, you can remove such HTML from the description).
- Inform the team that a new order is in effect from now on - what is edited where, and where to find data.
Step 9: Documentation and Training
Document in an internal wiki or document:
- A list of key metafields and metaobjects and their purpose.
- A short 'how-to' for staff: e.g., “To add a new training plan to a product, go to Settings > Custom Data > Metaobjects > Training Plan and add an entry, then assign it in the Training Plan field on the product card.”
- Update procedures, e.g., the new product onboarding template should include filling in specific metafields (a checklist can be used).
- With documentation, you'll avoid someone on the team asking 'what is field X for?' in six months, or – even worse – creating another one, starting a mini-hell all over again.
Step 10: Continuous Improvement
Data architecture is a living organism. Monitor:
- Is the team adhering to the rules? E.g., are they not entering strange values (if so, perhaps a new option needs to be added to the dropdown list, or the description clarified).
- New needs: When the marketing department comes up with a new content section, stick to the established approach – instead of asking them to 'add a field to the description,' immediately consider if it might be another candidate for a metaobject or a set of metafields in a specific category.
- Performance and integrations: If your store grows, observe whether queries for new data are slowing down pages (with good practice, this shouldn't have a noticeable impact; Shopify only advises against overusing nested references to avoid overly heavy GraphQL queries). Check integrations with apps – many of them can already use native metafields, which is worth leveraging.
10 Principles of Good Data Architecture in Shopify (Checklist)
Finally, we've prepared a quick checklist – 10 principles, which are worth keeping in mind when designing (or refactoring) the data architecture in your Shopify store. Stick to them, and the specter of metafield hell will cease to threaten you:
- Plan your structure in advance: Before you quickly add a dozen metafields, take a step back and design a schema. Think about what data you truly need and how to group it. Planning the metafield and metaobject schema before launching your store will protect you from 'spaghetti' with oddly named fields at the last minute.
- Use consistent naming and conventions: Introduce your own prefix/namespace (e.g., myshop_) and clear key names. Define all fields in English or consistently in Polish – avoid mixing languages. This way, it's immediately clear what everything is. Document field names and meanings so the team has a single source of truth.
- Utilize Shopify Product Category and standard attributes: If possible, assign products to standard Shopify categories and use the suggested category metafields. This is a ready-made data skeleton for your industry – it facilitates organization and integrations (e.g., with Google). Many of these are actually metaobjects with predefined values that you can use or modify.
- Metafield for simple data, metaobject for complex blocks: Stick to the rule: single value per object = metafield, repeatable set of values = metaobject. Don't create 10 separate metafields where they logically form a single section of information – consider a metaobject. Also, avoid situations where you duplicate the same content across many metafields on multiple products – that's a sign to extract it into a single metaobject.
- Avoid data duplication – aim for a single source of truth: If the same information needs to appear in several places, store it only once. Metaobjects are designed for this – one edit = change everywhere. Don't copy-paste content between product descriptions or pages; instead, a reference to a metaobject or even a link via a collection/category will ensure consistency.
- Apply validations and predefined options: Don't leave fields completely 'free' if you can restrict them. A dropdown list will prevent typos and provide consistent values (e.g., 'Yes/No' instead of ten variations). Validate formats (URL, numbers, emails, etc.). This will automatically prevent chaos in entered data - and facilitate their later use.
- Group metafields by purpose: Shopify allows you to create sections in the admin panel for metafields (via namespace and names). Use this to, for example, group technical fields separately and marketing fields separately. It will be easier for admin panel users, and you'll maintain mental order.
- Test scalability early: If you plan to have thousands of products, ensure your data model can handle the scale. It's better to detect early on that, for example, combining 5 metaobjects into one product slows down the page, rather than after you've added 1000 products. If in doubt, consult with a performance developer, use a dev store for testing, and simulate larger amounts of data.
- Document and educate the team: Even the best architecture will fail if people don't adhere to it. Therefore, ensure documentation of the metafield/metaobject schema and train the team on how to use them. A simple 'how-to add a new value here or there' guide + field descriptions in the admin panel will save you frustration and prevent rogue actions (where someone, due to lack of knowledge, adds their own fields in their own way).
- Review and improve continuously: Data architecture is not set in stone. Regularly (e.g., quarterly) review your metafields: have any become outdated? Have new needs emerged (e.g., a field everyone needs but handles differently)? Are there any unnecessary values? It's better to correct small things continuously than to wait until chaos ensues again. Remember that the cost of neglecting order grows exponentially - it's always cheaper to maintain cleanliness than to undertake a major store overhaul.
By adhering to these principles, you will build a store that grows. Your product data will be ready for use in any way.
Summary and Next Steps (CTA)
Escaping metafield hell is possible – but it requires a conscious approach to data architecture. The key is planning and utilizing modern Shopify tools: metaobjects for repeatable content, product categorization for order, and validation for data quality. This way, your store will not only avoid chaos but also become more flexible, scalable, and easy to manage. The e-commerce manager will gain control and confidence that every piece of product information is in its place, and the developer will sleep soundly knowing they won't have to untangle 'data spaghetti'.
Do you feel your store is already stuck in metafield chaos? Or perhaps you're planning growth and want to do it "data-driven," but without the mess"? A Shopify Agency like attomy will help you audit your current structure, develop a refactoring plan, and implement metaobjects, validations, and other improvements so that your store is ready for scaling without compromise. Get in touch with us – together we'll free your business from metafield hell and build solid foundations for future growth.